
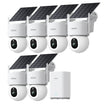
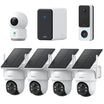

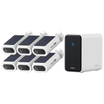

In today's world, enhancing your home security is a top priority. One of the most effective and modern ways to do this is by installing a video doorbell. Not only does it allow you to see who's at your door from anywhere, but it also acts as a deterrent to potential intruders. This guide will walk you through the entire process of installing a video doorbell, from selecting the right model to the final setup and usage tips. Also check out our hot sellers from the last 30 days: Night Vision Security Cameras
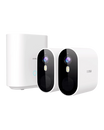
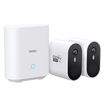
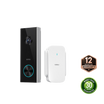
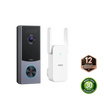
What’s in the aosu Video Doorbell Box?
Before you start the installation, let’s take a look at what’s included in your video doorbell package of aosu and how each component is used.
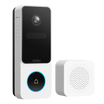
1. Video Doorbell
The video doorbell is the main component, equipped with a camera, microphone, speaker, and motion sensors. It’s designed to be installed at your front door, providing live video feed and two-way communication capabilities.
2. Mounting Bracket and Mounting Wedge
-
Mounting Bracket: This bracket is used to attach the doorbell securely to your wall or door frame. It serves as the foundation to hold the video doorbell in place.
-
Mounting Wedge: A wedge can be used if you need to angle the doorbell for a better field of view. It helps optimize the camera’s viewing angle, especially if your door is in a corner or an awkward position.
3. Wi-Fi Homebase
The Wi-Fi homebase acts as a hub that connects your video doorbell to your home network. It ensures a stable and secure connection and often doubles as a storage device for recorded footage.
4. USB-C Charging Cable
This cable is used to charge the video doorbell if it’s battery-powered. The USB-C connection is known for its fast charging capabilities and ease of use.
5. Extension Wires
If you’re installing a wired video doorbell, the extension wires help extend the length of your existing doorbell wiring, making it easier to connect to the new device.
6. Screw Packs and Phillips-Head Screwdriver
-
Screw Packs: These include all the screws and anchors you’ll need for mounting the bracket and attaching the video doorbell. Different types of screws are provided to accommodate various surfaces like wood, brick, or stucco.
-
Phillips-Head Screwdriver: A handy tool provided to help you install the screws. It’s specifically designed to fit the screws included in the pack, ensuring a snug fit.
7. Doorbell Detaching Pin
This small tool is essential for removing the video doorbell from the mounting bracket without causing damage. It’s especially useful if you need to recharge a battery-powered doorbell or perform maintenance.
8. Screw Hole Positioning Sticky Card
The sticky card helps you accurately mark where to drill holes for the mounting bracket. It’s a convenient guide that ensures precise alignment, making the installation process smoother.

Setting Up the Wi-Fi Before Installing the Doorbell
Before physically installing your video doorbell, it’s crucial to set up the Wi-Fi connection to ensure smooth operation. Here are the steps.
1. Download the aosu App
First, download aosu App from the App Store (iOS) or Google Play Store (Android). This app will guide you through the setup process and allow you to control and monitor your video doorbell.
2. Plug in the Homebase
Next, plug in the Wi-Fi homebase to a power outlet. Wait until the light on the homebase blinks green, indicating it’s ready to connect.
3. Press the Sync Button
Press and hold the sync button on the homebase for 3 seconds until you hear a beep. This indicates that the homebase is in pairing mode.
4. Power Up the Video Doorbell
Press and hold the power button on the video doorbell for 5 seconds. This will power on the device and prepare it for pairing with the homebase.

5. Scan the QR Code
Using the video doorbell, scan the QR code displayed on the aosu app. Hold the doorbell unit 4-6 inches away from your phone for optimal scanning. The app will confirm when the QR code is successfully scanned.
6. Wait for Connection
Wait for the video doorbell to connect to the homebase. This process may take a few minutes. Once connected, the app will notify you, and you can proceed with the physical installation.
How to Install Your aosu Video Doorbell: A Step-by-Step Guide
Installing your video doorbell is a straightforward process that can significantly enhance your home security. Whether you have a battery-powered or wired model, following these steps will ensure a smooth installation. Here’s a detailed guide to help you get started.
For Battery-Powered Video Doorbells
First, find the best position to install your device. Choose a location at chest height to ensure an optimal field of view, capturing both tall and short visitors as well as packages left on the ground. Make sure the spot you choose has a strong Wi-Fi signal to maintain a stable connection. Poor connectivity can lead to delays or missed notifications, undermining the security benefits.

Next, use the provided screw hole positioning card to mark where you need to drill. This sticky card ensures accurate placement of the holes, making the installation process smoother and more precise. Proper alignment at this stage will save you time and effort later.
After marking the spots, follow these steps:
-
Drill the Wall: Drill holes in the wall at the marked positions. If you’re drilling into brick or concrete, you may need a masonry bit.
-
Insert Wall Anchors: Once the holes are drilled, insert the wall anchors that come with the kit. These anchors are essential as they provide a solid grip for the screws, preventing the bracket from coming loose over time.
-
Attach the Bracket: Position the bracket correctly and use the screws from the screw pack to attach it securely. Make sure the bracket is level and firmly attached, as this will ensure that your video doorbell is stable and positioned correctly.
Finally, snap the video doorbell onto the mounting bracket. This should be a straightforward process if the bracket is installed correctly. When the battery is low, detach the doorbell using the detaching pin included in your kit. Recharging is simple: use the provided USB-C charging cable, which allows for quick and efficient charging.
For Wired Video Doorbells
Safety is paramount when dealing with electrical components. Begin by shutting off the power to your existing doorbell at the breaker box. This step is crucial to prevent any electrical accidents during installation.
Next, remove the old doorbell by detaching it from the wall and disconnecting its wires. Handle the wires carefully to avoid any short circuits. These wires will be used to power the new video doorbell. Connect the wires to the terminals on the back of the video doorbell, following the manufacturer's instructions. Typically, this involves connecting the live wire to one terminal and the neutral wire to the other.

After connecting the wires, proceed with the same steps as those for the battery-powered installation:
-
Mark the Holes: Use the screw hole positioning card to mark the holes, ensuring they are correctly aligned.
-
Drill the Wall: Drill the wall at the marked positions and insert the wall anchors to secure the mounting bracket.
-
Attach the Bracket: Attach the bracket with screws, ensuring it is secure and level. A firmly attached bracket is essential for the proper functioning of the doorbell.
-
Mount the Doorbell: Snap the video doorbell onto the mounting bracket. Make sure it is securely attached to avoid any potential falls or damage.
By following these detailed steps, you'll have your video doorbell installed and ready to enhance your home security in no time. Remember, the key to a successful installation is careful preparation and attention to detail. If you encounter any issues, refer back to the manufacturer’s instructions or seek professional assistance.
How a Video Doorbell Makes a Big Difference
Installing a video doorbell is a vital step to ensure safety, deter crime, and enhance convenience. Here are the key advantages of having a video doorbell at your doorstep.
Enhanced Security
A video doorbell significantly enhances your home's security. With a built-in camera, you can monitor your front door in real-time from anywhere. This allows you to see who is at your door before opening it, helping to prevent unwanted or suspicious visitors from gaining access. Many video doorbells also feature motion detection, alerting you to any activity at your doorstep even if the doorbell isn’t pressed.
Deterrence of Criminal Activity
The presence of a video doorbell can deter potential intruders. Criminals are less likely to target a home with visible security measures. The camera's presence acts as a powerful deterrent, reducing the risk of break-ins and vandalism. Just knowing that they are being watched is often enough to dissuade would-be intruders.
Convenience and Communication
Video doorbells offer unparalleled convenience by allowing you to communicate with visitors remotely. Through your smartphone, you can see and speak with anyone at your door, no matter where you are. This is particularly useful for:
-
Accepting deliveries
-
Giving instructions to service providers
-
Greeting guests while you’re away
This remote communication feature ensures you never miss a visitor and can handle situations at your doorstep without being physically present.

Package Theft Prevention
Package theft is a growing concern, but a video doorbell can help mitigate this issue. You can monitor your deliveries and receive notifications as soon as packages arrive. Some models even allow you to interact with delivery personnel, providing instructions on where to leave packages safely. The mere presence of a camera can deter thieves from targeting your home, ensuring your deliveries remain secure.
Conclusion
Installing an aosu video doorbell is a smart investment for enhancing your home security. It offers easy installation, superior convenience, and significant protection against intruders and package theft. By following our installation guide, you can quickly set up your device and start enjoying the benefits of real-time monitoring and communication. Embrace this advanced technology to ensure peace of mind and a safer home environment.
FAQs
How Do You Install the Aosu Video Doorbell Step by Step?
Installing the aosu video doorbell is simple. Mount the bracket, connect the wiring to your existing doorbell, and attach the camera. Use the app to complete setup, adjust motion zones, and test notifications. Following these steps ensures your smart doorbell works perfectly, providing reliable home monitoring.
What Features Make the Aosu Video Doorbell Stand Out?
The aosu video doorbell stands out with HD video, two-way audio, motion detection, night vision, and smart alerts. Its AI-powered technology provides accurate notifications while integrating with home devices. These features enhance home security and convenience, giving homeowners real-time awareness of visitors and potential threats.
How Does the Aosu Video Doorbell Integrate With Smart Home Systems?
The aosu video doorbell integrates seamlessly with smart home devices and voice assistants. Users can control cameras, receive alerts, and automate home routines. Smart integration allows remote monitoring and synchronized security features, making it an essential component of connected homes.
What Are the Common Issues With the Aosu Video Doorbell and How to Fix Them?
Common aosu video doorbell issues include app connection errors, motion alert delays, and wiring problems. Troubleshoot by checking Wi-Fi strength, ensuring correct wiring, and updating the app. Proper setup and regular maintenance keep the system functioning reliably for continuous home protection.
How Does the Aosu Video Doorbell Improve Home Security?
The aosu video doorbell enhances home security with real-time alerts, motion detection, and two-way communication. HD video allows you to see visitors clearly, while instant notifications deter intruders. Combined with other smart devices, it creates a layered security system for ultimate peace of mind.
What Accessories Are Needed to Install the Aosu Video Doorbell?
Essential aosu video doorbell accessories include mounting brackets, screws, anchors, a screwdriver, and optional wiring extenders. These items ensure a secure and stable installation. Using recommended accessories guarantees optimal performance and long-lasting reliability for your smart home security system.
What Do Users Say About the Aosu Video Doorbell?
Users praise the aosu video doorbell for easy installation, reliable motion detection, and clear HD video. Many highlight the convenience of smart alerts and two-way audio. Positive reviews emphasize how it improves home safety, offering real-time monitoring and added peace of mind.
How Can You Optimize Aosu Video Doorbell Performance?
Optimize aosu video doorbell performance by adjusting motion sensitivity, positioning at the correct height, ensuring strong Wi-Fi, and keeping firmware updated. Proper placement avoids blind spots, enhances alert accuracy, and ensures clear video. These steps maintain reliable operation for 24/7 home monitoring.


Zostaw komentarz
Ta strona jest chroniona przez hCaptcha i obowiązują na niej Polityka prywatności i Warunki korzystania z usługi serwisu hCaptcha.