


Whether you’re upgrading to a sleek smart doorbell or installing your first doorbell in a new home, the process involves more than just screwing a device to your wall. Modern doorbells blend technology, design, and security, making installation a critical step to ensure functionality and longevity. In this comprehensive guide, we’ll cover every aspect of doorbell installation, from choosing the right type to guidance on how to install. Plus, we’ll answer your burning FAQs and help you decide whether to DIY or call in the pros. Let’s dive in! Also check out our hot sellers from the last 30 days: Front Door Security
Why Proper Doorbell Installation Matters More Than You Think?
Gone are the days when doorbells were just a button and a chime. Today’s doorbells are smart, connected, and packed with features like HD cameras, motion detection, and two-way audio. Proper installation ensures four parts:
- Reliable performance: Ensure you never miss a visitor with consistent alerts, strong connectivity, and dependable battery life.
- Enhanced Safety: Protect your home with secure wiring, solid mounting, and full weatherproofing against the elements.
- Compliance with Regulations: Meet local building codes, HOA requirements, and privacy laws to avoid fines or mandatory changes.
- Seamless Smart Home Integration: Connect effortlessly with your smart locks, lighting, and security systems for a truly connected home experience.

Key Considerations Before Installing a Doorbell
Installing a doorbell may seem simple, but several factors can affect its performance and suitability for your home. Here are the most important things to consider:
1. Doorbell Type and Power Source
Start by choosing the right type for your needs—wired, wireless, or smart:
- Wired doorbells use your home’s electrical system and often require a compatible transformer.
- Wireless and smart doorbells are typically battery-powered or rechargeable via USB, making them easier to install.
2. Installation Location and Connectivity
Pick a location that gives a clear view of visitors and is close to your Wi-Fi router if using a smart model. Poor connectivity can cause video delays or missed notifications. Also, ensure the doorbell is mounted at the right height and angle for optimal coverage and audio clarity. A well-placed doorbell improves both security and convenience.
3. Smart Integration
If you're going smart, check compatibility with your existing home devices like smart locks, security cameras, or voice assistants. Integration can streamline home access and enhance your overall system. Being able to unlock your door or view footage remotely adds convenience. Make sure your devices work well together before you buy them.
4. Weather Resistance
Since your doorbell will face the elements, choose one built for your climate. Look for an IP rating of IP65 or higher to ensure protection against rain, dust, and temperature changes. Weather-resistant designs last longer and perform better in tough conditions. This is especially important if you live in an area with extreme weather.
5. Security and Privacy
Smart doorbells collect video and audio data, so protecting that information is crucial. Look for features like data encryption, two-factor authentication, and customizable privacy settings. Some models also let you control when recordings happen or who can access them. Strong privacy controls keep your home and data safe.
How to Install a Wired Doorbell Camera
A wired doorbell camera offers reliable performance with continuous power and a stable connection, eliminating the need for battery changes. Here’s a step-by-step guide to installing one in your home:
Tools You’ll Need:
- Screwdriver (Phillips and flathead)
- Voltage tester
- Multimeter
- Drill and drill bits (masonry or drywall)
- Drywall anchors (for stucco walls) or masonry drill bits (for brick/concrete)
- Waterproof silicone sealant (e.g., GE Silicone II)
- Heat-shrink tubing (optional for cold climates)
- Level (to ensure the doorbell is mounted straight)
- Wire stripper
Step 1: Power Down and Safety Check
Start by locating your circuit breaker. In most U.S. homes, the doorbell circuit is labeled as “Bell” or “Front Door.” If you can't find a specific label, you may need to turn off the main breaker—though this is generally a last resort.
Tip: Mark the turned-off breaker with a glow stick or your phone’s flashlight for easy identification. Avoid using candles, as they pose a fire risk. Next, use a voltage tester on the doorbell wires to ensure the power is off. If the tester lights up or beeps, electricity is still flowing, so do not proceed until the power is completely off.
Step 2: Prepare the New Doorbell
Before mounting, check the voltage compatibility. Most smart doorbells, such as the Ring or Nest, require 16–24V AC and at least 10VA of power. Use a multimeter set to AC voltage (V~) to test the wires. If the voltage is below 16V, you will need to upgrade your transformer.
Once you’ve confirmed the voltage is appropriate, strip about a quarter-inch of insulation from each wire. Loop the exposed wire clockwise around the terminal screws and tighten them securely. If you’re installing a smart doorbell with a digital chime, you’ll need to connect the jumper wire as instructed. If it's a mechanical chime, skip this step.
Step 3: Mount the Doorbell
Now, it’s time to mount the doorbell. First, drill pilot holes for the mounting bracket. If you're installing the doorbell on stucco walls, use drywall anchors. For brick or concrete surfaces, a masonry drill bit is required. Drill the holes slightly upward to avoid water seepage.
Before mounting the doorbell, apply a bead of waterproof silicone sealant (like GE Silicone II) around the bracket to protect against moisture. For colder climates, wrap the wires with heat-shrink tubing to prevent cracking due to freezing temperatures.
Step 4: Test and Configure
Once the doorbell is mounted and wired, restore power at the circuit breaker. Give the smart doorbell around 30 seconds to boot up. Then, follow the in-app setup instructions to finish the configuration.
Pro Tips:
- Enable features like Quick Release (for theft prevention) if available.
- Adjust the motion detection zones to avoid false alarms triggered by sidewalk traffic, which is common in suburban areas where houses typically face the street.
How to Install a Wireless Doorbell Camera
Installing a wireless doorbell camera is a straightforward process that doesn’t require any complicated wiring. Just follow these simple steps to get your system set up and ready to go.
Step 1: Prepare Your Tools and Equipment
Before you begin, gather everything you’ll need:
- Wireless doorbell camera kit (doorbell button, camera, chime unit)
- A screwdriver (if screws are required)
- Command strips or mounting screws (depending on your preferred method)
- A level (to ensure proper alignment)
- Access to your Wi-Fi network
Step 2: Choose the Ideal Installation Location
Select the right location for your doorbell camera to ensure optimal performance:
- Height: Mount the camera at about 48 inches from the ground for ADA compliance and convenience.
- Angle: Tilt the camera down about 15° for the best motion detection range.
- Avoid Signal Blockers: Choose a spot free from thick walls or metal that may block Wi-Fi signals. If needed, use a Wi-Fi extender to boost the signal in areas with weak connectivity.
Step 3: Mount the Camera
Now that you’ve chosen your location, it’s time to securely mount the camera:
- No-Drill Option: If you want to avoid drilling holes, use Command Outdoor Picture Hanging Strips. These strips can hold up to 16 pounds and are designed for outdoor use.
- Drill Installation: For a more permanent option, drill pilot holes and use screws to attach the mounting bracket to the door frame or wall. Make sure the camera is level.
- Magnetic Mounting: For extra flexibility, purchase a steel junction box cover and secure the camera with magnets.
Step 4: Sync the Doorbell and Chime
Once the camera is securely mounted, it's time to sync it with your chime and Wi-Fi network:
- Connect to Wi-Fi: Follow the manufacturer’s instructions to connect the doorbell to your home’s Wi-Fi network. Make sure the doorbell is within range of your router.
- Sync the Chime: Place the chime unit inside your home where it’s easily audible. Move it closer to the doorbell during setup if needed for a better connection.
- Test the Connection: Press the doorbell to ensure that it rings the chime and that the video feed works correctly.
Step 5: Customize Settings and Test the Camera
Now that your system is connected, you can fine-tune the settings to suit your needs. Adjust the motion detection sensitivity to focus on the areas you want to monitor while minimizing false alarms. Also, check the camera feed to ensure it provides a clear view of your front door and surrounding area. Use the mobile app to test two-way audio and confirm the video quality is up to your standards.
Step 6: Secure and Finalize the Installation
Finally, make sure everything is securely in place. If your doorbell uses batteries, ensure they are properly installed. In warmer climates, lithium batteries tend to last longer and perform better than alkaline ones. If your doorbell offers battery-saving features, such as a "Battery Saver" mode, activate these to help extend battery life and optimize performance.
Best Doorbell Camera Types
Here we list three doorbells with some prominent advantages from aosu.
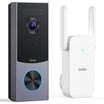
Video Doorbell Ultra
For those who want powerful performance, extended battery life, and secure local storage—all without a monthly fee—the aosu Video Doorbell Ultra is the ultimate choice for front door protection.
Key Features:
- No Monthly Fee: The HomeBase with built-in 8GB memory and 60-day loop-recording means your videos are safely stored at home, and you can view them anytime and anywhere.
- 166° Field of View Eliminates Blind Spots: Head-to-toe viewing lets you see exactly who is at your door and your packages on the ground.
- 180 Days From 1 Charge: The built-in rechargeable battery is 58% more efficient due to our technology. This ensures 180 days of flawless front door coverage on a single charge.

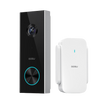
Video Doorbell Pro
The aosu Video Doorbell Pro offers smart security without the hassle of subscriptions or complex setups. Designed for modern homes, it combines convenience, performance, and compatibility in one sleek device.
Key Features:
- No Monthly Fees – Enjoy full access to features with no recurring charges.
- Wireless & Battery-Powered – Easy installation with no hardwiring needed.
- Smart Assistant Compatible – Works with Alexa and Google Assistant for voice control and real-time alerts.
- High-Definition Video – Crisp, clear video so you never miss a visitor.
- Instant Notifications – Get alerts on your phone when motion is detected or someone rings the bell.

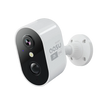
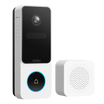
Video Doorbell SE
The aosu Video Doorbell SE delivers a full view of your doorstep and smart features that keep your home secure—without any subscription fees.
Key Features:
- Head-to-Toe View – With a 170° ultra-wide angle and a 9:16 vertical aspect ratio, you get a complete view of your front door—from visitors to packages on the ground.
- Package Detection with Instant Alerts – Built-in smart detection automatically recognizes packages and notifies you the moment they arrive, helping keep your deliveries safe.
- Two-Way Audio – Talk to visitors in real time from anywhere using the built-in microphone and speaker, giving you full control and convenience.
- No Subscription Needed – Enjoy advanced security features with zero monthly fees.

Comparing Wired, Wireless, and Smart Doorbells: Pros and Cons
|
|
Pros
|
Cons
|
Best for
|
|
Wired Doorbells
|
No battery changes;
Continuous power;
Compatible with advanced features
|
Require existing wiring;
Need professional help
|
Older homes with existing doorbell systems or tech-heavy setups
|
|
Wireless Doorbells
|
Easy DIY installation;
Portable and flexible placement
|
Regular battery replacements (every 3–6 months); Potential signal interference
|
Renters, modern homes without wiring, or temporary setups
|
|
Smart Doorbells
|
Video recording;
App integration;
Motion alerts;
Package detection
|
Higher cost;
Subscription fees for cloud storage;
Wi-Fi dependency
|
Apartments;
Suburban homes;
Vacation or Rental homes
|

Conclusion
Doorbell installation might seem daunting, but with the right preparation, it’s a manageable project that boosts your home’s security and convenience. Whether you opt for a budget-friendly wireless model or a top-tier smart doorbell, prioritize safety, compliance, and functionality.
Got more questions? Drop a comment below or tag us on social media with your doorbell setup—we’d love to hear from you!
Your home’s first line of defense starts at the front door. Make it count.
FAQs
How can you install a wired doorbell the right way?
To install a wired doorbell, switch off the power, connect the wires to the transformer, and mount the button and chime unit securely. Test the connection before restoring power to ensure proper function.
What is the best way to install a wireless doorbell?
Place the wireless doorbell receiver near your main entry and mount the transmitter outside. Sync both devices per instructions, check signal strength, and adjust volume or tone settings for optimal performance.
How do you set up a smart doorbell with a camera?
Charge or wire your smart doorbell, download its companion app, and follow pairing steps. Adjust camera angle and motion sensitivity to monitor visitors effectively and strengthen home security.
How can you fix common wired doorbell problems?
Check the doorbell transformer, button, and wiring for damage. Tighten connections, replace the chime unit if needed, and verify voltage output to restore system reliability.
How can you safely transform doorbell wiring?
Turn off power, inspect wire insulation, and install a compatible doorbell transformer. Use voltage testers and secure connections to ensure electrical safety before reactivating the circuit.
How do you integrate a doorbell into your home security system?
Connect your doorbell to your home network and security hub. Use the manufacturer’s app to sync real-time alerts, video access, and automation—ideal for smart systems like those from aosu.
How can you make DIY doorbell installation easier?
Choose pre-marked mounting templates, use adhesive mounts when possible, and double-check wiring before finalizing your setup. This ensures quick, tidy results without professional help.
Which is better: wired or wireless doorbell?
A wired doorbell offers stable power and continuous operation, while a wireless model provides flexibility and easy installation. For modern homes, advanced wireless models from aosu combine reliability with smart convenience.


Leave a comment
This site is protected by hCaptcha and the hCaptcha Privacy Policy and Terms of Service apply.